Friday, March 22, 2024

Connect ATP Private EndPoint Database via Public Load Balancer using SQL Developer

Connect ATP Private EndPoint Database via Public Load Balancer 

In my previous post, we have seen How to create ATP Database with Private Endpoint aka with private dedicated IP of ATP database. Click here to refer previous post.

Now, in this post we will see how we can connect an ATP database (created with a private endpoint) via public load balancer.

Click on Networking -> Load balancer -> load balancer
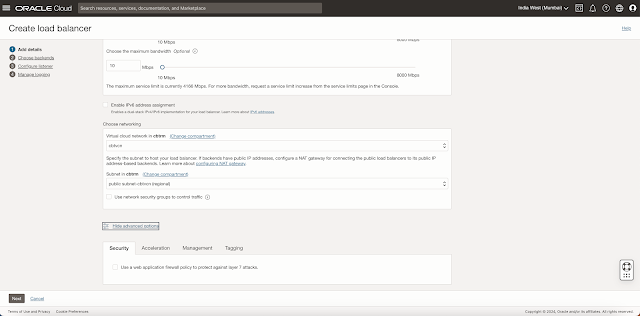
Click on "Create load balancer" button

  • Provide Load balancer name = CBTPubLB
  • Choose visibility type = Public
  • Assign a public IP address = Ephemeral IP Address (This will automatically assign a public IP address from the available IP address from the pool.)


  • Choose VCN = cbtvcn (Your VCN)
  • Choose subnet = public subnet-cbtvcn (Your public subnet)
Now Click Next.


Note that in my case I will add backends after creating the Load balancer. If you want to add a backend now, you can.

Now, specify the health check policy
  • Choose Protocol as TCP from the dropdown menu.
  • Choose Port = 1522
Leave other fields as default

In advance tab. I am not changing anything. Keeping all the fields as default values.

below screenshots are just for your references purpose.


Click Next to configure Listener
  • Provide proper Listener name, In my case, it is "DB_LSNR"
  • Specify the type of traffic as TCP
  • Specify the port as 1522
I am not providing any SSL certificate here.


Click Next 

Now, You can enable the Error log and access log,
Here in my case I have enabled only Error log, please refer below screenshot


Click on Submit button to create load balancer

It will take a couple of minutes to create a load balancer.


Now you can see the load balancer is created but the health is Critical. This is due to backendset. Yet we have not configured the backend set.

Now Click on the Backend sets -> Backends -> Add backends

Provide the IP address of your ATP database which is shown under the Network section of your ATP detail page. Please refer to the screenshot below for your reference.


Now Click on CBT_BS bankend set. 
Here you can see number of backends are zeero.


Click on Add backends button

Provide IP address and port number.

Click Add button


Click on close button to close the window.


Once added, health will be in critical state, It will take a couple of minutes to change the health status.


You can see backend is added but health is in Critical state.

You can see more details by moving your mouse pointer on Critical text.

Must remember that, you need to configure VCN ingress rule for your private and public subnet.

In my example, refer below screenshot of default security list - public subnet and Private security list for private subnet.


Once done, check the status of your public load balancer. 
Backend health must be OK. This means that the Load balancer is able to ping the ATP database.

Now you can see the backend health in Green Icon as OK.

After adding ingress rule it will take 1-2 minutes to reflect in load balancer to make the health OK. 


You can see the overall load balancer health is now also in Green- OK


Now, Click on the Autonomous database CBTATP1 -> click on the "Database connection" button.

Click on Download wallet button -> provide the wallet password.


It will download the zip file. Unzip the wallet.zip file.
Open the tnsnames.ora file
Replace your ATP host name with the Public Load Balancer IP.

refer below screenshot for your reference.

Save tnsnames.ora file


Zip all the files again and give another name of zip file. Here in my case it is CBTATP_LB_IP.zip.

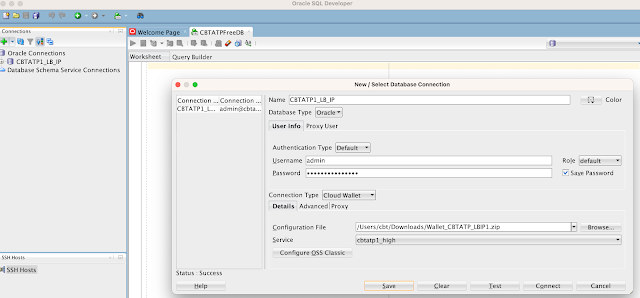
Open the SQL developer -> click on new connection
  • Provide connection name - CBTATP1DB
  • username = admin
  • password = <admin password> (This is the same password which you given during creation of your ATP database)
  • choose connection Type= Cloud Wallet
Browse and select the .zip file which you created just now.

click on the test button to test.


This is it.


Hope this article will help you.
Thanks for reading.


Thanks & Regards,
Chandan Tanwani


Saturday, March 9, 2024

How to connect to ATP Database from SQL Developer

How to connect to ATP Database from SQL Developer

In this blog, I am covering how to connect to an ATP database from SQL developer. Many times we face difficulties connecting to ATP databases from SQL developer; this is because we miss the prerequisite of connecting databases. In this blog I am going to highlight the same.

In this blog I will cover specifically the ATP database which created where "access type: 


Let see the first our Network access type is "Allow secure access from specified IPs and VCNs"


Now, the prerequisite is to configure the access control list. This is a very important an crucial part.

Click on Edit link under Network -> Access Control List. It will open a Pop-up window to add an IP address.
Here in my case I have added my laptop IP address from where I will connect to my ATP database.
Please refer to the screenshot below for your reference.

Click on Save button.


Once you add your specific IP address. Now let's look at the default security list of your VCN.
In my case this is the default security list which was configured during the creation of my VCN.
Below screenshot is just for your reference.


Now, Download the wallet file.
Click on the "Database connection" button highlighted in the screenshot below.


Click on "Download Wallet" button.


Provide wallet password. Must note this password somewhere in your notepad, This will be used whenever you will connect to the ATP database using a wallet file.


Click on the Download button to download the wallet file.

Till this point, we have completed the prerequisites. Now Open your SQL developer.

Click on "New Connection"


Fist give the connection Name,
  • Provide Username as admin
  • Password as < password > (This is the same password that you had given at the time of creating ATP database.)
  • Connection typ = Cloud Wallet 
  • Configuration File = < Path of your Cloud Wallet that you have just downloaded from ATP database connection page. 
  • Service = Choose which service type you want to select. In my case it is cbtatp_tp
Now, click on "Test" button.

Hope this article will help you.
Thanks for reading.


Thanks & Regards,
Chandan Tanwani

Thursday, March 7, 2024

Create Autonomous Database (ATP) with Priavte EndPoint

Create Autonomous Database (ATP) with Private EndPoint

As you know ATP database is a PaaS service, you will only get the hostname of the ATP database. Whatif we need the IP address of the ATP database. One scenario for this requirement is to set ATP as a backend set in a public load balancer. How do we keep the ATP database as a backend set in a public load balancer? It is not possible without Private endpoint IP as on date. You must require a private endpoint IP address to add as a backend set of load balancer.

I will cover the following things in my blog,
1) Create ATP database with private endpoint.
2) Create Public Load Balancer and Configure with ATP database as Backend set.
3) Configure Networking security rules to access ATP via Load Balancer.

In this blog, I am covering, "Create ATP database with private endpoint." 1st point only. 2nd and 3rd point will be seen in separate blogs articles respectively. 

Let's start,
Click on Create Autonomous Database button.


Enter Compartment Name = cbtrm

Provide Display Name = CBTATP

Database Name = CBTATP

You can choose different display name and database name. I am giving the same for both the fields for simplicity purposes.


As of date there is only one option available to choose for the database version i.e. 19c
Here minimum ECPU count is 2 and storage is 1024 gb.

Backup retention you can change. But I kept the default one.


Provide password for admin user.

And now in the Network access section. Choose "Private endpoint access only", select your VCN and Private subnet from the dropdown list.


Now, choose the license option.

I kept other things as default settings. Nothing changed. Below screenshots are for your reference only.


This is it. 
Click on "Create Autonomous Database" button


It will take 2-3 minutes to create Autonomous database.


You can see the ATP database is nor provisioned. 
You should note couple of things, like, Database Name, Resource aloocation, Network (here you can see the private endpoint IP address), backup etc.

In next section we will see how to connect to the ATP database using cloud shell and SQL Developer.

Hope this article will help you.


Thanks & Regards,
Chandan Tanwani

Thursday, February 29, 2024

Connect to ATP database using Cloud Shell - IO Error: The Network Adapter could not establish the connection

Connect to ATP database using Cloud Shell - IO Error: The Network Adapter could not establish the connection


Today, I was trying to connect to my ATP instance through the Cloud Shell and encountered with error,


Error Message = IO Error: The Network Adapter could not establish the connection (CONNECTION_ID=uHg0tQ3uSESoYdqEoM9U2Q==)

At first, it seems to be a connection issue or TNS issue. But do you know what the real problem is?
First see, How am I connecting to the ATP in Cloud Shell.


It will prompt you on this screen.


Now, I ran sql /nolog to connect to the sql prompt. And then set the cloud config with ATP wallet.zip file

SQL> set cloudconfig WalletXXXX.zip

and then tried to connect to admin user by using following command

SQL> connect admin/<youradminpwd>@XXXXprod1_tp
  USER          = admin
  URL           = jdbc:oracle:thin:@z!q%xdU@XXXXprod1_tp
  Error Message = IO Error: The Network Adapter could not establish the connection (CONNECTION_ID=EfqZQt86R6a9NCZ6ELHjRQ==)


See, what I encountered the error. "IO Error: The Network Adapter could not establish the connection"
Don't you foresee it's connection issue or TNS issue? I assume the same. But this is not a connection issue.

Now if I connect admin using the following method, it runs successfully.
SQL> connect admin@XXXXprod1_tp
Password? (**********?) ************
Connected.


Please find below screenshot as well for your reference.


This is looking weird but this is the fact.

Happy Cloud Shell


Thanks & Regards,
Chandan Tanwani

Wednesday, January 24, 2024

AIOUG - MultiCloud Conference 2024

 AIOUG - MultiCloud Conference 2024

I would like to share that, The Oracle Users Group Evangelists of AIOUG (All India Oracle Users Group) in the region are organizing a Multicloud event in Feb 2024.

The Multicloud event brings hundreds of technology professionals to one Venue. The event is a highly concentrated four-city conference in Gurugram, Pune, Bengaluru, and Hyderabad with collaboration and transformation while providing the deep technical education needed for our Indian cloud Community. Join us for in-depth technical sessions, Fireside chats, Keynotes, and motivational sessions, and, of course, open your mind and expand your network at the Multicloud event.

I am thrilled to announce that I am speaking in AIOUG's MultiCloud conference. Below are the details for the same.

📅 𝐒𝐞𝐬𝐬𝐢𝐨𝐧 𝐃𝐚𝐭𝐞𝐬: 11 Feb 2024 (Pune) & 18 Feb 2024 (Bengaluru)
🕒 𝐓𝐢𝐦𝐞: 03:30 PM - 04:20 PM
𝐅𝐨𝐫 𝐦𝐨𝐫𝐞 𝐢𝐧𝐟𝐨𝐫𝐦𝐚𝐭𝐢𝐨𝐧 - https://lnkd.in/e57hG-Mk

🌐 𝐀𝐛𝐨𝐮𝐭 𝐒𝐞𝐬𝐬𝐢𝐨𝐧: Run Your Workloads Anywhere
OCI lets you combine cloud services from multiple clouds to optimize cost, functionality, and performance. OCI's multicloud database services help you modernize your databases and applications with unique capabilities, including Oracle's Real Application Clusters (RAC) Autonomous Database and Oracle Exadata Database Service paired with leading services from Microsoft Azure, Amazon Web Services (AWS), and Google Cloud Platform (GCP). 

👉 Let's connect during the event Face to Face and learn more things with eachothers experiences.

Unlock the secrets of multicloud design considerations, architecture patterns, and strategies to build a dynamic multicloud environment in this insightful session – where knowledge-sharing and experience exchange take center stage!

🚀 Spread the Excitement! Share this post and let your network know about the incredible speaker we have lined up for Multicloud 2024!

hashtag


Thanks & Regards,
Chandan Tanwani

Thursday, August 24, 2023

Oracle Database 23c - Lock-Free Reservations to Prevent Blocking Sessions

Oracle Database 23c - Lock-Free Reservations to Prevent Blocking Sessions

When multiple concurrent sessions/users are modifying or updating the same rows for example shopping cart multiple sessions and users are keeping the same product into the cart. This will reserve the quantity for their session until the payment is not completed.  If you allow concurrent transactions to access data, you must control the transactions to preserve application correctness. Multiple save points need to be created in application logic.

Let's take an example of a product inventory table.


As you can see here, we have a product_inv table. It has 6 rows out of which the first record is going to be updated by session 1 and Also session 2 has initiated the transaction on the same row.

Session 2 is in waiting mode as session 1 has not completed the transaction. Neither commit nor rollback done.

For developers, such a situation needs to be handled at application level by making save points or making some global variables or in session cache.
 
In Oracle Database 23c, new feature "Lock free reservation" helps you to update the same row without blocking your session. Lock-Free Reservation provides an in-database capability for transactions and operates on so-called reservable columns. It enables concurrent transactions to proceed without being blocked on updates made to reservable columns.

Let's make prod_qty column reservable by using below command,

alter table product_inv modify (prod_qty reservable);

Once you done, now concurrent session can update the same row as shown in below example.


To make this example more realistic, let's add the check constraint so that no one can reserve more than available quantity.

For example, We do have a total 10 quantities, out of that session 1 has reserved the 8 quantities. What if session 2 is reserving 3 quantities which are out of the availability. Hence check constraint is required.
Let's look below snapshot where it is giving an error in session 2 while reserving the 3 quantities.


Some facts about Lock Free Reservations as below,
  • Only numeric (number) columns can be marked as reservable columns.
  • You can only do + or - (increase or decrease) operation on a reservable column. Cannot modify column like prod_qty=5 with literal value to update the column.
  • You can either update the reservable columns or non-reservable columns. Both cannot be updated in the same statement.
  • Your updated transaction is reservable until you commit or rollback. In the above example of updating the product quantity is reserved for that particular session. Other sessions can reserve quantity based on the availability of product quantity.

Benefit of Lock Free Reservations is, it reduces the headache of the developers to write code and maintain each session's value in application.


Thanks & Regards,
Chandan Tanwani